
Affiliate disclosure: This post may contain affiliate links. Please see full disclosure.

Updated January ’26
Disclaimer: This content is for educational purposes only. It is not meant to treat, diagnose, or cure any condition and does not offer medical advice. If you feel unwell, seek professional medical help. See our full disclaimer here.
This pine tar soap recipe is easy to make following a traditional cold-process lye soap method. It’s is a natural deep pore cleaner that’s been used for centuries to help skin issues like psoriasis, eczema, dandruff, insect bites, and other minor irritations.
The pine tar helps to remove the top layer of skin, which is where the majority of dirt and oil reside. This is a very effective way to get your skin nice and clean, while also moisturizing it with all-natural ingredients like olive or coconut oils.
What Is Pine Tar Soap?
Pine tar soap is a traditional remedy, in use for more than 2,000 years (1), used for skin conditions like psoriasis, eczema, and flaky scalp, but it can also be used to soothe and treat the irritations from poison ivy, oak, and sumac.
It contains pine tar, which is extracted from an array of pine species by heating the wood and extracting the resin. Thanks to modern extraction and purification techniques, the pine tar for soap making nowadays is a more stable, safer product. And I strongly advocate for purchasing a high-quality pine tar rather than trying to make your own. You’ll see why in the precautions section below.
This old-fashioned soap contains pine tree resins so has a strong, earthy, piney scent, but that’s reduced a little as the soap cures and in this particular recipe, I’ve included essential oils that help to smooth out and refine the overall scent.
Pine tar soap is also safe for dogs and works to soothe dry, itchy skin complaints and alleviates flea dermatitis. Plus, it naturally repels fleas and ticks. However, it’s important to remember that a dog’s normal skin pH is different from humans, so this recipe should only be used on dogs occasionally. Having said that, this cold-process soap recipe is free of synthetics and is rich in moisturizing, nourishing oils so it shouldn’t disrupt a dog’s natural acid mantle. Nor should it excessively dry out their skin.
Pine tar has been known of and used for various applications since the Iron Age, but it’s not until Ancient Greece and Rome that there are any actual records of pine tar being used medicinally, where its use was described by Hippocrates (2).
Benefits of Pine Tar Soap for Skin Care
The Australian Journal of Dermatology reports that pine tar has a whole slew of beneficial actions for topical use. These benefits of pine tar in soap include:
- Antipruitic
- Anti-inflammatory
- Antibacterial
- Antifungal
- Antiproliferative
- Antiseptic
- Astringent
- Keratoplastic
- Cytostatic
Pine tar soap has been used to relieve itching, inflammation, and excessive skin cell growth in a huge range of skin conditions, including:
- Eczema
- Dermatitis
- Psoriasis
- Seborrheic dermatitis
- Sun burn
- Nappy rash
- Prickly heat
- Hives
- Chicken pox
- Insect bites
- Anus pruritus
- Genital itching
Is Creosote In Pine Tar Soap Dangerous?
Creosote is a by-product of burning some woods and other materials, and it’s carcinogenic. There are also other compounds in low-grade pine tar that are carcinogenic or otherwise harmful to your health in large quantities. However, high-quality, veterinary-grade pine tar has undergone rigorous purification processes to reduce or eliminate all but a tiny trace of any potentially harmful component.
Most soap makers agree that using a pine tar that’s extremely pure eliminates any risk and that, actually, we’re exposed to far larger amounts of creosote and other carcinogens daily from cooking on a barbecue or from cooking and eating bacon.
How to Choose the Correct Type of Pine Tar to Use in Soap
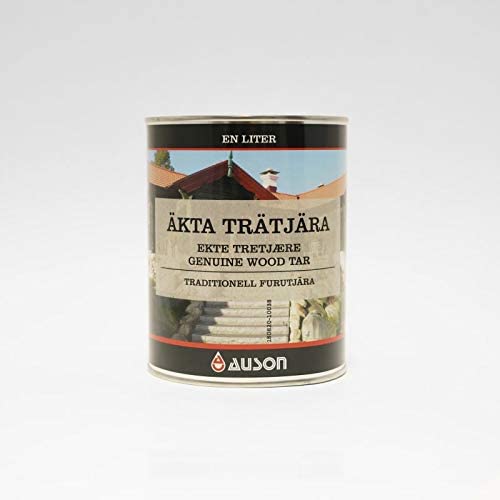
As mentioned above, because of concerns over potentially harmful compounds in low-grade and homemade pine tar, I strongly advocate using a pure, high-quality commercial product. I prefer this genuine pine tar from Auson, as it’s a good price and it’s safe for use in beauty and self-care products.
Unlike my pine pitch salve recipe or my delicious pine needle tea recipe that do encourage you to forage for your own ingredients, for pine tar soap, please buy a safe pine tar product.
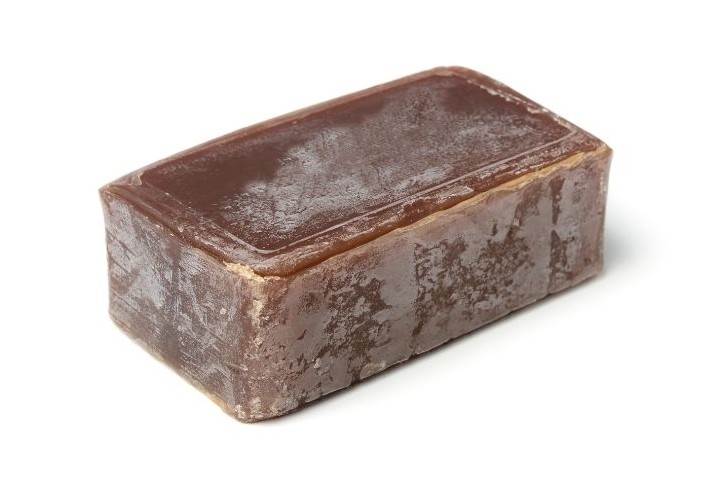
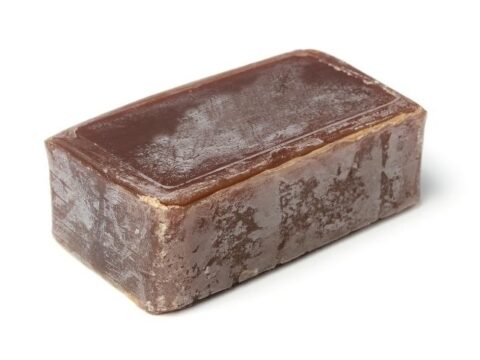
What Does Pine Tar Soap Look Like?
Pine tar soap is dark and often rugged-looking, but that’s all part of the charm of a handmade soap. The pine tar itself is a dark, thick, syrupy, sticky goo that has a potent, but not unpleasant, smell.
What Does Pine Tar Soap Smell Like?
It’s pungent! Pine tar soap has a deep, rich, campfire-like scent. It’s a masculine, woodsy, earthy smell. The scent does dissipate a little bit as the soap cures. And in this particular recipe, I’ve added citrusy and floral essential oils that smooth out and lighten the scent of the pine tar.
Tips for Making Pine Tar Soap
Tip 1: Ditch the Stick Blender
A word of caution before you dive into making pine tar soap. Unlike a lot of other cold process soaps, this one sets up FAST! It comes together so rapidly, you only need a silicon or wooden spoon instead of a stick blender. In fact, you should avoid your stick blender altogether for this particular soap.
Tip 2: Don’t Want to Mess With Lye? Do This Instead
If you don’t want to mess with cold process soap making and want something a little easier for your first try, check out my melt and pour soap guide and recipe ideas, then you can make your own melt and pour pine tar soap.
Tip 3: Be Prepared
Although this pine tar soap recipe is easy to make, you do need to be prepared, largely because it comes to trace so quickly, and once it does, you only have a short timeframe to get it from your soap pot into the mold. So make sure you’ve got everything laid out and ready to use before you begin. This includes pepping your soap molds so they’re ready to accept the thickened soap mixture as soon as it’s ready.
You need decent chemical-resistant gloves and some (not at all flattering) safety goggles. Now, I know that sounds like overkill, but you’re working with lye, and it can cause you some serious damage. So be smart and gear up!
Tip 4: Treat the Pine Tar as Oil
If you want to work on your own soap recipe using pine tar, make sure, when tweaking another recipe or doing your own calculations, that you treat the pine tar as oil.
Tip 5: Mix at Low Temperatures
For the best results when making this pine tar soap recipe, mix it at low temperatures. The lye solution should be at room temperature, while the oils should be no warmer than 85F (30C).
Tip 6: Use Slow-to-Trace Oils
Again, because this pine tar recipe is so quick to trace, it can be useful to add slow to tract oils to slow the recipe further. Do note that my soap recipe is already comparatively slow to trace for this kind of soap, but it’s still pretty quick.
If you’re new to soap making, then I wouldn’t advise making any adjustments to this recipe, though, as this one is designed for beginners and experienced soap makes alike and is a good compromise between ease of production, soap quality, and time to trace.
If you’re determined to make adjustments, though, slow to trace oils include olive oil and lard, while quick to trace oils include castor oil and palm oil.
Tip 7: Avoid Adding Essential Oils That Increase Time to Trace
Because pine tar has a really pungent scent, it’s nice to create other scent layers that complement the masculine, woody fragrance with essential oils. However, some essential oils actually speed up time to trace. Spicy oils like cinnamon, ginger, and thyme are notorious for speeding up time to trace, which is great in some recipes, but less so in this one. Instead, I like adding essential oils that work well to balance the pine tar and either don’t impact trace or slow it down. Lavender is great for slowing trace and balancing out the pine tar scent because of its lightly floral, delicately soothing properties. Other decelerating and complimentary essential oils for pine tar soap recipes include:
- Eucalyptus
- Lemon Myrtle
- Lemongrass
- Peppermint
- Rosemary
- Spearmint
- Citrus oils (orange, lemon, lime, and grapefruit)
If you’ve read my candle making guide for beginners, you’ll know I never, ever use or recommend fragrance oils because they’re artificial and pose serious health concerns. And so I won’t list recommendations here, either. If you use pure, therapeutic-grade essential oils, you don’t need fragrance oils. The only oils that can be difficult to get to stick in soap are citrus oils, and if you get them at least 5 times folded, they’ll stay in the soap just fine.
Tip 8: Warm the Pine Tar Before You Use It
Pine tar is very thick and sticky, so it can be a bit challenging to work with at room temperature. So, while you’re getting started with the other ingredients, I strongly recommend standing the can of pine tar in a bowl of extremely hot water. As the pine tar gets warm, it loses a little of its viscosity and becomes easy to pour, measure, and work with.
Tip 9: Give Your Pine Tar Soap a Refined Finish
Yes, it can be nice to have a rugged, rustic look to your soap and, because of the naturally dark color and rough texture of pine tar soap, this is the norm. However, if you’re going to gift or sell this soap, it’s nice to give the product a more professional finish. Pouring the soap into a single loaf mold then cutting when it’s set enough is a good option, as you get a nice roughish top and smooth, clean sides. Plus, you can get a lovely 100% natural or handmade soap stamps that give a nice, professional finishing touch.
Tip 10: Use Accurate Measurements
While this pine tar soap recipe is fairly easy, it is still cold-process soap making, and therefore, it’s kind of “sciency”. So for successful soap, you do need to be accurate in your measurements. Therefore, using well-calibrated, accurate weighing scales is essential. You can’t use cup measures and you can’t wing it, particularly if you’re a novice soap maker.
How to Make Pine Tar Soap Step-By-Step
This pine tar soap recipe is surprisingly easy, sets up fast, and produces a smooth, natural, long-lasting soap. All you'll need are a handful of ingredients to produce your soap batter and a few supplies like a soap pot and a spoon.
Ingredients
- 5 oz (141g) distilled water
- 1.9 oz (107g) lye (sodium hydroxide)
- 1/2 tsp salt
- 9 oz (255g) olive oil (60%)
- 3.75 oz (107g) coconut oil (25%)
- 0.75 oz (22g) castor oil (5%)
- 1.5 oz (43g) pine tar (10%)
- 0.30 oz (8.5g) lavender essential oil
- 0.30 oz (8.5g) rosemary essential oil
Instructions
Step 1: Get Your Protective Gear On
First things first - before you reach for your soap pot, gear up! Remember, lye is caustic and can cause nasty injuries, so don't take any chances. Even the lye solution is dangerous until the saponification process is complete.
Wear your gloves and safety goggles!
Step 2: Add Water and Salt
Put your pot on a trivet or heat-resistant mat.
Take your distilled water and add it to the soap pot. Next, stir in the half teaspoon of salt. While the salt is optional, I recommend you go ahead and add it because it makes it easier for the soap to release from the mold.
Step 3: Add Lye
Next up is lye. Pour it into the salt water and stir until it dissolves.
CAUTION: This mixture gets very hot very quickly, so avoid touching it or the pot.
CAUTION: During this stage, the lye water releases strong fumes that you should avoid inhaling, so make sure you're working in a well-ventilated area and that you don't get too close to the pot.
Step 4: Let it Cool
For this pine tar soap recipe to be successful, and to give you enough time to work properly, you need to let the lye water cool more than many other cold-process soap recipes. This helps to stop the soap batter setting up so quickly that it's nearly impossible to work with.
You want to let the lye water cool for a few hours, until it reaches roughly room temperature, between 70F (21C) and 80F (26C).
Step 5: Prep the Oils
Once the lye water is almost at room temperature, measure your liquid oils into an inert, heat-resistant, roomy container (think stainless steel, ceramic, or enamel).
In a separate pan over medium heat, melt the coconut oil, then add it into the other oils.
Step 6: Add the Pine Tar
At this point, you're almost ready to produce your soap batter. But first, you need to add the pine tar to the oils and stir thoroughly until fully incorporated.
Step 7: Make the Soap Batter
You're almost there! But before you combine your two mixtures, here's a crucial step: Make sure you're wearing your gloves and safety goggles. (I know, I'm a boring old nag, but really, it's super important here).
Wearing your safety gear (sorry-not-sorry), pour the lye water into the lightly heated oils and stir (using a silicon or wooden spoon that you only use for making soap) until you've got a nicely thickened soap batter.
The cooler the mixtures, the longer it the soap batter takes to thicken, but in general, it only takes up to five minutes. Keep stirring until it reaches the consistency of a thick chocolate pudding or cake batter.
Step 8: Fill the Molds
I like to make one or two large loafs then cut them into slices after unmolding, but you can also use individual molds. Whichever you choose, once your batter is thick, act quickly so the pine tar mixture doesn't set up before you've had a chance to get it in the molds.
Pour the soap batter into the molds and then firmly bang the filled molds on the tabletop to eliminate air bubbles and help the soap settle.
Step 9: Let it Set
Leave the soap alone for at least 48 hours before you try to unmold it. At this point, you can unmold it, slice it, and stamp it.
Step 10: Leave it to Cure
Pine tar soap is pretty soft at first, and needs time to harden up. It's advisable to let thie pine tar soap recipe cure for six weeks. From that point, it should be sufficiently hard to be a high-quality, long-lasting soap.